Open file security warning prompt SCCM OSD
The following registry keys will disable the Open file security warning;
One REG key is required to be added to Current user.
REG ADD “HKU\Default\Environment” /V SEE_MASK_NOZONECHECKS /T REG_SZ /D 1 /F
Second REG key is required to add to Local Machine;
REG ADD “HKLM\SYSTEM\CurrentControlSet\Control\Session Manager\Environment” /V SEE_MASK_NOZONECHECKS /T REG_SZ /D 1 /F
Adding a registry key to local machine is easy and straight forward. However, adding to a current user registry key bit a tricky task for few.
I will show how to add the current user and as well as local machine keys without any issues;
1. Open the task sequence in edit mode
2. Create a run command line step then copy the below command;
REG LOAD HKU\Default C:\Users\Default\NTUSER.DAT

This will mount default user registry keys from NTUSER.DAT to HKEY Users\Default key
3. Create a 2nd command line step then copy the below command;
REG ADD “HKU\Default\Environment” /V SEE_MASK_NOZONECHECKS /T REG_SZ /D 1 /F

This will add registry value to the default user profile
4. Create a 3rd command line step then copy the below command;
REG UNLOAD HKU\Default

This will unmount the NTUSER.DAT file which we have mounted in step 2
5. Create a 4th command line step then copy the below command;
REG ADD “HKLM\SYSTEM\CurrentControlSet\Control\Session Manager\Environment” /V SEE_MASK_NOZONECHECKS /T REG_SZ /D 1 /F

This will add the SEE_MASK_NOZONECHECKS key and value to the local machine.
Now save the task sequence and test the deployment.

As the msg indicated, the certificate assign to the media about to expire or expired. If this is a boot media, we have no choice to renew the certificate but re-create the new media.
Normally when you create a boot media, the certificate is valid for one year from the date of creation. This can be increased or decreased while creating the media.
If you getting the msg when you are using pxe boot then you need to identify the missing or expired certificate then create a new one. That will fix the issue.

You will see this behaviour because the newly created task sequence doesn’t have an associated boot image.
To fix this issue, go to the task sequence which you are trying to deploy then right click then open the properties.
Under the advanced tab, tick Use a boot image then browse to the required boot image.
Now, all available for options for OSD task sequence deployment options will be visible.

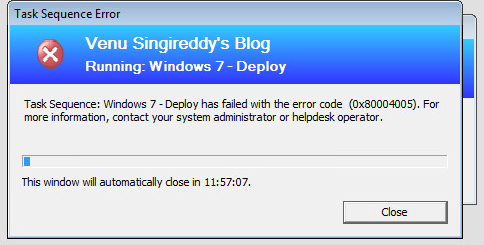
An error occurred while retrieving policy for this computer (0×80070057). For more information, contact your system administrator or helpdesk operator

When I have reviewed the smsts.log, I found below error;
MP Location returned an empty site code
CCM::SMSMessaging::CLibSMSMPLocation::RequestMPLocation failed; 0×80004005
Setting wizard error: An error occurred while retrieving policy for this computer (0×80070057). For more information, contact your system administrator or helpdesk operator.
As a starting point;
- The machine is getting IP from DHCP
- Boundary and boundary groups configured correctly
- OSD works fine in other sites
- Used BootMedia instead of PxE
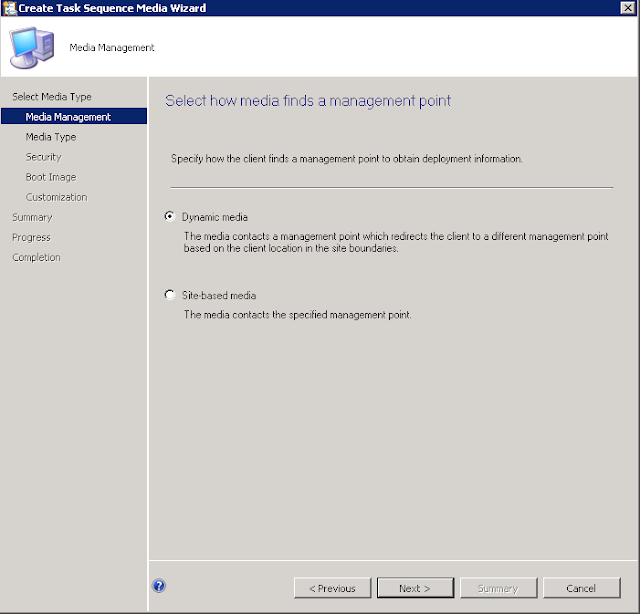
Initially I have created the boot media using Dynamic Media. This time I have created Site-based media then tested again.
That worked without giving any error.
So when you have multiple sites, if you are using boot media to boot into the task sequence use Site based media option when creating the boot media.
File security warning C:\Windows\System32\osdsetuphook.exe
You may receive File security warning for C:\Windows\System32\osdsetuphook.exe when running SCCM OSD task sequence.

You most likely will get this message in OSD Results and Branding stage.
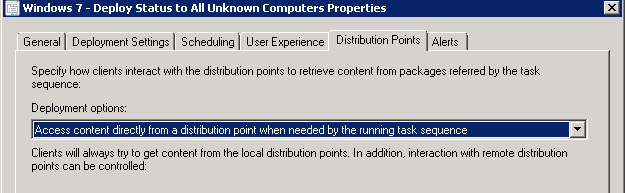
In my observation, you receive open file security warning, when the task sequence is set to run ‘Access content directly from a distribution point when needed by the running task sequence’.
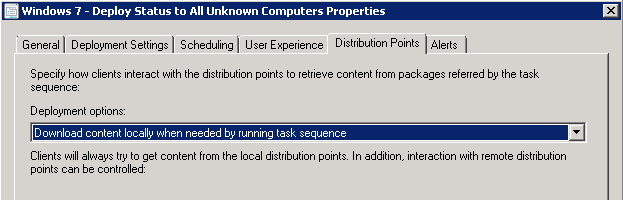
If you change this option to ‘Download content locally when needed by running task sequence’, the open file security will go away and the task sequence complete without any msg.
We can address this issue in multiple ways;
- Change the deployment options as mentioned above
- Disable the open file security and then re-enable at the end
- Copy the scripts locally, then launch the scripts using the local paths
task seqeunce failed with error code 0×00000645

To resolve task sequence error 0×00000645, make sure you have entered the correct edition (/Set-Edition) with correct client product key.
For full list of client product keys, please visit technet @ https://technet.microsoft.com/en-us/library/jj612867.aspx
How to extend SCCM task sequence error dialog timeout?
However, using a SMSTSErrorDialogTimeout task sequence variable we can extend the duration of the task sequence error msg timeout.
First create a step in the beginning of your task sequence and on the Set Task Sequence variable step;
Name: Add a desired name
Task Sequence Variable: SMSTSErrorDialogTimeout
Value: Enter the value (in Seconds) how long you want to keep the window open

Now the task sequence error dialog will show for extended duration as below;
That’s it. Next time if the task sequence fails, it will wait for 12 hours before it closes the error msg window.
Server build automation using SCCM task sequence
I wont be detailing on how to create each and every step of the task sequence. I believe every SCCM or SOE designer knows how to create a operating system deployment (OSD) task sequence.
So below is the sample task sequence which we will be using to deploy a server operating system (2008 R2 Std, 2008 R2 Ent, 2008 DataCenter, 2012 R2 Std, 2012 R2 Ess, 2012 R2 DataCenter, etc..).

What is server operating system task sequence?
Server build task sequence is another user driven (not really but…) SCCM task sequence which will be used to automate all the steps involved in building a server with the help of SCCM, MDT, HTA and various scripts.
Because of the automated tasks all the servers built using this method will have same configuration regardless who builds the server.
We can adopt the similar approach for server migrations, without loosing the data.
What are the advantages of build automation using SCCM task sequence?
As like any other automation, the build process simplifies all the steps involved in building a server.
It will reduce the manpower and increase the product quality. The task sequence will reduce bad builds by eliminating the dependency on the engineers. As all the tasks are automated and will take only 2 min of engineer’s time for each build. This will reduce the cost per server build drastically.
Using the OSD task sequence we can apply various types of operating systems to VM’s and as well as to the physical servers.
How is this deployment works?
By default SCCM OSD task sequence with MDT does most of the tasks. To extend the task sequence capabilities further we will use scripts in the background and HTA file in the front end, for the engineer to choose the options.
On initial reboot, the engineer will choose to Pxe boot. As soon as the task sequence initialised, an hta file will be launched, which will look as below;

This HTA file is the key for complete automation. The engineer will choose options as required with in the HTA.
The key points to note on HTA is;
- Machine name is mandatory and with minimum length requirements
This field can be customised for length, acceptable characters etc…
- Select Operating System type to choose desired OS
We can add more options if required. By default the task sequence will install Server 2008 R2 STD
- Select server roles will only install by selection
If none selected, no server role will be installed
- Select additional software step allows the engineer to select other optional software
- Start OS Deployment button will be greyed out if the server name is not entered as required
Each and every selection runs a separate script to set a custom task sequence variable. This custom task sequence variable will be used to execute the step when running the task sequence.
What other things we can configure?
This is an endless question, however we can configure most of the tasks which you can do with a script.
What is next?
Well, start writing up HLD, finalise with LLD, Develop the solution based on LLD, automate all the tasks then start deploying.
For OS deployments to end user devices, please read this article
Sample SCCM Task Sequence for Windows Server 2008 R2 Deploy

Sample SCCM Task Sequence for Windows Server 2008 R2 Build and Capture

Windows could not configure one or more system components SCCM OSD

If you are building new model laptop (in my case Dell E7240, 7250,7450 etc) you may have received this message after the applying the drivers and upon the first reboot in SCCM OSD.
The reason for this error is, one of the driver / driver application requires Kernel-Mode Driver Framework (KMDF).
To resolve this issue, you need to find out which driver is causing the problem then remove that driver from the driver package. In my case (for Dells) Intel Dynamic Platform Thermal Framework driver caused the problem issue.
Now, create 2 additional packages, one for Kernel-Mode Driver Framework (KMDF) and another one for offending driver application.
In the task sequence create an application installation step then first add Kernel-Mode Driver Framework (KMDF) then add a restart step. After the restart add the application installation step and add the offending driver package.
This will resolve the Windows could not configure one or more system components. To install Window, restart the computer and then restart the installation error and the SCCM OSD task sequence will continue.
Sample SCCM Task Sequence for Windows 10 Deploy

Sample SCCM Task Sequence for Windows 10 Build and Capture

Activate Windows using MAK key using SCCM task sequence
As these machines hardly talk to the corporate network so they cannot reach KMS server.
To overcome this issue, we need to use MAK key activation.
So to automate this process we can create another task sequence using your existing deploy task sequence then remove answer file (if you have one) at Apply Operating System Image step then modify Apply Windows Settings step;
1. Add MAK key on Apply Windows Settings step

2. Add activation step anywhere after Setup Windows and Configuration Manager step
To active the windows Add a Run Command Line step, then add following command
cscript.exe C:\Windows\System32\Slmgr.vbs /ato
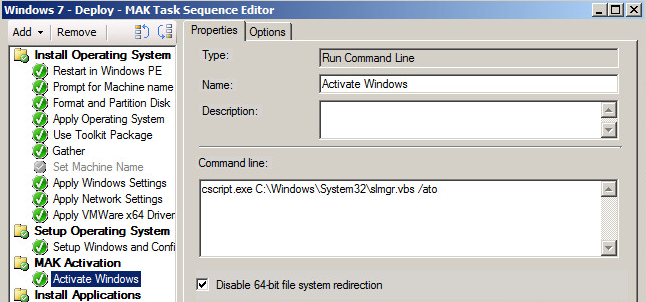
That’s it.
Once the OS deployment is complete, the windows already activated.
Few things to remember;
- If activation step is not added then, the MAK key will be added to the machine. However, it will show 3 days until automatic activation.

- If the task sequence is running from offline media and without internet access, then the step will fail.
To mitigate the task sequence failure select continue on error on the activation step.
Sample SCCM Task Sequence for Windows 7 Deploy with MAK


Sample SCCM Task Sequence for Windows 7 Build and Capture

This happens mainly when re-imaging machine specially after a motherboard replacement.
Reviewing SMSTS.log (From X:\Windows\Temp\SMSTSlog\) will show the following error msg.
reply has no message header marker
Failed to get client identity (80004005)
failed to request client

If we check the date and time of failed event in the log file, it will have a wrong date and time.
In my test environment it showed as 01/01/2013. Correct the date and time then test.
This time it should work without any issue.
WMI query for computer model
There are two main methods we can choose to use in WMI query to filter the model.
One is Model which will work for most of the vendors or hardware manufactures.
However if you are using Lenovo, I highly recommend to use the version query, as the model query will be different to the base model of the system. Read this for further information.
So the command line for computer model WMI query is;
WMIC computerproduct get model
Command line for computer model version WMI query is;
WMIC csproduct get version
Window could not parse or process the unattend answer file for pass

Window could not parse or process the unattend answer file for pass [specialize].
The settings specified in the answer file cannot be applied.
The error was detected while processing settings for component [Microsoft-Windows-Shell-Setup].
I m not using an answer file for this deployment. The only thing i have added to the Windows 10 deploy task sequence is the product key.
I have re-checked the product key and it was an incorrect key for this version of Windows 10. Once I have corrected the key, the task sequence worked fine.
Note;
We can deploy Windows 10 using SCCM deploy task sequence without a product key and also without an unattended answer file. However the task sequence will prompt for product key while configuring the windows.
To over come the product window popup issue, add the product key to the Apply Windows Settings step in the task sequence.
Product key for Windows 10 Enterprise Technical preview is;
NKJFK-GPHP7-G8C3J-P6JXR-HQRJR